-
Browse All Data Sets
How We deliver data
Partnerships

Schedules
The most accurate airline schedules database on the market, configured by airline, airport, or alliance, at region, market and route level.
Status
Flight Status Data tracks thousands of flights, cancelations, and status changes every day
Airfares
With insights into airline pricing strategies, Airfare Data is sourced from +2000 sources, and updated weekly.
Historical
Analyze airline, airport and route performance with our unique archive of historical flight information.
Seats
Gain the most accurate forward view of flight seats data possible, with cabin availability data in First, Business, Premium Economy, Economy+ and Economy.
Emissions
Predict the fuel burn and emissions of scheduled flights based on the aircraft type, engine type and typical fuel consumption.
Minimum connection times
Access industry-standard data sets which provide the minimum possible connecting time for both a passenger and their luggage to connect between an arriving flight and their departing flight.
Master Data
Master data underpins schedules data, any change, however small, can impact the integrity of any related flight information.
Passenger Booking Data
Airline passenger traffic data/passenger booking data for forecasting and modeling the economic impact of new routes using international bookings data and online fare data.
Global Flight Connections
Use our Connections Data to do market share analysis and spot route, airport and destination development opportunities.

API
Flight Info API enables the entire travel ecosystem to access and seamlessly integrate a variety of flight data sets into existing systems and applications.
Alerts
Flight Info Alerts enables the travel and aviation industries to make better decisions faster, with a continuous stream of immediate flight changes.
Direct
Flight Info Direct contains a variety of ready-to-query OAG data sets, ready to integrate and analyze. Say goodbye to data silos and streamline operations by integrating our data into your systems and tools.
.jpg)
Resellers and Integrators
Partner with OAG to enhance your offering, unlock new revenue streams, and deliver richer insights to your customers.
-
Analytics

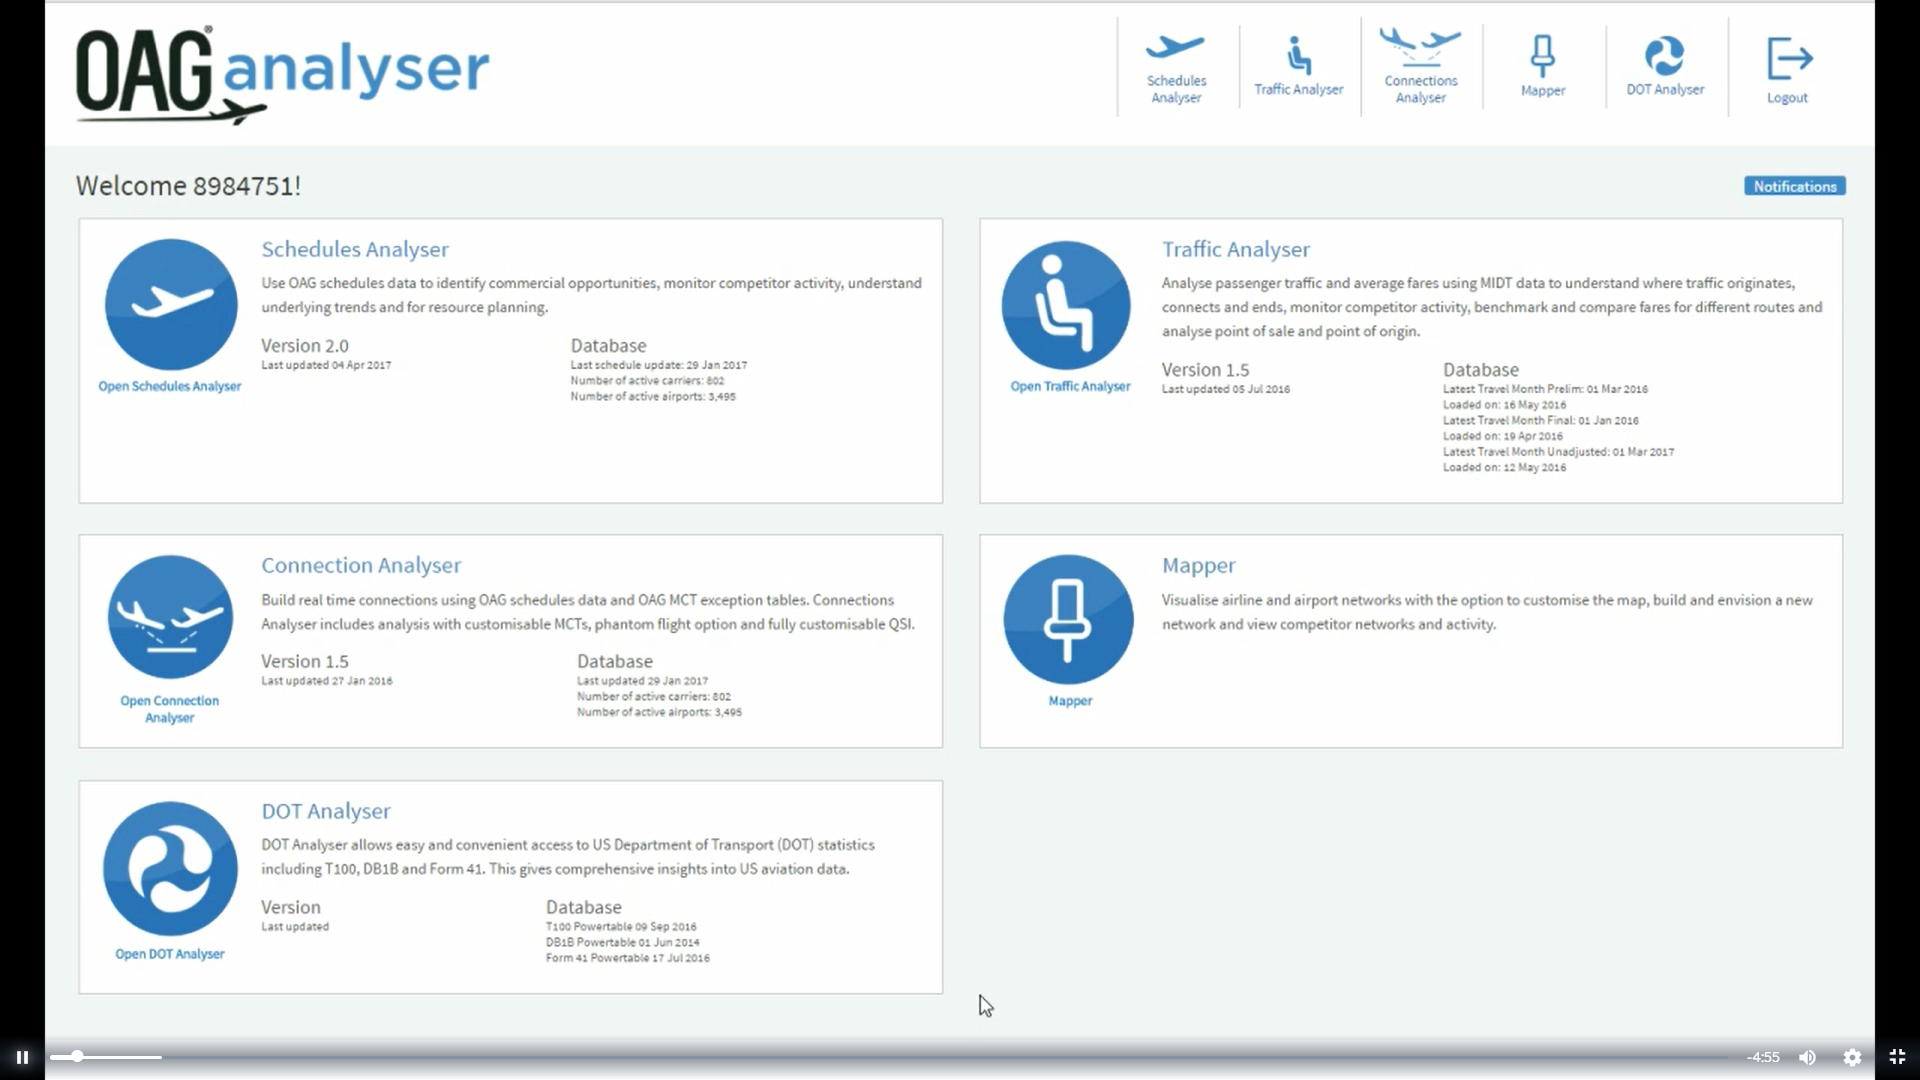
Overview
Explore our fast, responsive aviation analytics tool, and examine flight frequency and capacity trends, flight statistics by route, and airport performance.
Flight Schedule Analytics
Analyze opportunities for new routes, identify underlying aviation trends and monitor competitors.
Airfare Analytics
Analyze how Airfares differ across carriers, routes and channels so you can assess competitive positioning and monitor how pricing changes over time.
Passenger Booking Analytics
Analyze air passenger traffic flows across markets for more accurate route planning, forecasting and competitor analysis.
-
We power the air travel ecosystem
Trusted by leading organisations

Airlines
Create a highly customized view of the broader aviation landscape, tailored specifically to your unique operational needs and strategic objectives.
Airports
Our flight data helps more than 300 airports around the world spot commercial opportunities and provide improved customer experiences across the board.
Airport Service Providers
Increase efficiency and deliver a world-class passenger experience for your customers with flight data for airport service providers.
Consultancies
Drive accurate and data-backed decisions with the highest-quality flight data available, giving your strategies the edge over competitors.
Finance
Detect new indicators, recognize risk and forecast performance with the trusted, specialist flight data that has been helping key institutions in the finance industry identify the best investments.
Governments & Security
Distribute resources efficiently, reduce wait times and improve passenger experiences with data that informs processes in real time.
Hospitality
Utilize real-time data to allocate resources accordingly and stay up to date with real time flight information, so you can give customers the best experience.
Travel Technology
Join innovators in airport technology, E-commerce, FinTech, travel retail, hospitality tech and more to provide the systems that make travel simpler and more seamless for passengers and businesses alike.

View all case studies
Explore our customer stories to see how businesses across the globe harness OAG data to optimize operations, enhance traveler experiences and drive growth.
SANS
Partnering with OAG, SANS implemented the full Flight Info Direct data suite, including Schedules, Historical Data, Master Data, and more.
Swissport
Innovation in the cloud: how Swissport uses Flight Info Direct to power their global operations.
Pestana Hotel Group
Petsana Hotel Group use OAG data to power internal process, and future-proof operations.
IBA Group
IBA Group use OAG data to build, advise and innovate, leading the aviation finance industry.
-
Insights
Regional Market Analysis
Airlines and Routes
Airports
On-Time Performance
Reports
Webinars

All Blogs
Expert analysis, commentary, and perspectives on the trends shaping the aviation industry.
Aviation Market Analysis
The latest aviation market analysis, including insights into key flight data.
Future of Travel
Discover the latest travel technology trends and insights, including analysis of flight data.
Data, Technology and Product
Discover the latest in data, technology, and product updates. Learn about innovations that drive growth across operations and build customer relationships.

Regional Market Analysis
Regional and country-level flight data dashboards for market performance analysis.
Regional Market Analysis
Regional and country-level flight data dashboards for market performance analysis.
Regional Market Analysis
Regional and country-level flight data dashboards for market performance analysis.
Regional Market Analysis
Regional and country-level flight data dashboards for market performance analysis.
Regional Market Analysis
Regional and country-level flight data dashboards for market performance analysis.
Regional Market Analysis
Regional and country-level flight data dashboards for market performance analysis.
Regional Market Analysis
Regional and country-level flight data dashboards for market performance analysis.
Regional Market Analysis
Regional and country-level flight data dashboards for market performance analysis.
.png)
Busiest Routes of 2025
Annual report exploring the busiest routes in 2025, providing a comprehensive view of route performance and trends.
Busiest Routes Right Now
Discover the busiest air routes in the world, for both domestic and international flight routes.
Frequency and Capacity Stats
Find a weekly update of airline capacity data and monthly statistics including the world's biggest airlines, top country pairs and airline seats by region.
Airline Pricing Data
Stay ahead of the curve with analysis on the latest airline pricing and demand trends.
Takeoff
Extensive report detailing key performance insights and analysis of the world's top 20 major airlines.

Most Connected Airports in the World
Discover the most internationally connected airports in the world and the most domestically connected airports in the U.S.

On-Time Performance Flight Data
Discover the most punctual major airlines, plus a full ranking.

Reports
Explore our aviation reports and flight data insights, plus in-depth analysis on the future of travel.

Monthly Live Webinars
Discover upcoming live webinars and watch past sessions on demand.
-
Our company
Get in Touch
Events

About Us
We empower better travel with the data the world relies on, delivered through a platform you can trust.
Diversity & inclusion
OAG is dedicated to promoting the values of diversity, equity and inclusion in the workplace.
Careers
Ready for your next challenge? At OAG, our team's unique blend of talents and perspectives is what sets us apart.

Media Center
Discover the latest news, insights, and resources from the world's leading aviation data platform.

Monthly live webinars
Join us for our monthly webinars, in which industry experts join our panel to discuss the latest trends in aviation.